6 Tips for Safely Freezing Your Homemade Foods


I enjoy lining up freezer-safe containers on my kitchen countertops, filling them with my homemade foods, labeling them, and arranging them on freezer shelves. There’s huge satisfaction in this simple act because later, when I open the freezer door, I see the fruits of my labor and know I will have delicious, healthy food any time I want. Here are some tips from my kitchen to yours for safely freezing homemade foods.
1 - Have Freezing Supplies at Hand
Have a supply of freezer-safe containers, plastic bags, aluminum foil, and plastic wrap on hand as well as permanent markers and Scotch tape. Keep these supplies conveniently located so that you don’t have to go hunting for them.
2 - Freeze Foods Soon after They've Been Cooked
Freeze cooked foods after they’ve cooled down a bit either on the countertop or in the refrigerator. The same day is best, the next day is next-best. Don’t wait three or four days after cooking to move foods to the freezer. If you do, much of the flavor and nutrition will be lost.
3 - Choose the Right Containers for the Right Foods
Any food which is liquid or partially liquid, such as a soup or stew, or is soft and can be mashed down into a container, such as mashed potatoes or mashed rutabaga, can be stored safely in rigid freezer containers.
But if you are freezing solid foods such as blanched vegetables, you are best off using a plastic bag.
Breads and cakes do best with a tight wrap of aluminum foil which you then place in a sealable plastic bag.
Selecting the right container or wrap will assure the longest freezer life possible for your homemade foods.
Vacuum Food Sealers To Protect Your Frozen Homemade Foods
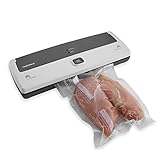
4 - Remove Air from the Freezer-safe Packages
Trapped air is the death of frozen foods. It is the primary cause of freezer burn.
For plastic bags, either suck the air out with your mouth or invest in a vacuum food sealing machine that does that for you.
For rigid containers, fill them to a point where, when you press down on the lid, there’s little space between the food and the lid. This is an art. Food expands as it freezes, so the freezing food may pop the lid or not. Experience will guide you here. If in doubt, under-fill a rigid container and then press plastic wrap onto the surface of the food, expelling air as you go. Seal with the cover and freeze.
5 - Label the Containers
Be sure to label your frozen homemade foods with the contents and the date you put them in the freezer.
I think we’ve all rummaged through mystery packages in our freezers, wondering what was inside them and when they were frozen because they weren’t labeled.
Use a permanent marker to label the packages with the date and contents. Write directly on plastic bags, but for freezer-safe containers, which you will probably want to use again, stick a length of Scotch tape to the top or side of the container and enter the date and contents on the tape. When it’s time to empty the container for a meal, the tape will come off easily and you can use the container again without there being writing you can’t remove.
6 - Inventory Your Homemade Frozen Foods
Once a week or so, take an inventory of what’s in your freezer. Look at the package labels for contents and date frozen, and make a plan to use the oldest foods first. All frozen foods have a point-of-no-return, where they just aren’t good anymore. You can follow these general guidelines for the life span of frozen foods, courtesy of Ohio State University.
Rigid Freezer Containers for Sale Online

Homemade Foods from Sally’s Kitchen that Freeze Well
When you’re in the mood for trying something new, take a look at these recipes. All are made to serve 6 to 10 people.
If you have a small family or are cooking only for yourself, make the entire recipe anyway, eat what you want on the spot, and then freeze the rest for convenient, quick meals.
What Do You Think?
Please leave a comment below to join the discussion on this article and share your thoughts. Let me and other members of the HubPages community know what you think.
If you are not a member here on HupPages, then sign up here. You can publish your own articles and even earn some money. It’s free to join!
© 2011 Sally's Trove. All rights reserved.


")